
How to Wrap Your Trees in Magical Lights


Christmas is just around the corner, and with the snow settling in, you’re running out of time to decorate. But what can you do about the trees looming on your property that look sad and lack any sign of life? This is where Christmas lights come in very handy. All you need to transform your property into a magical winter wonderland is some elbow grease and as many of the magical, flickery lights as you can find.
If you’re looking for something to liven up your property without having to make too many choices on what kind of decor to use, wrapping your trees in shimmery lights is a great idea. You can easily transform any landscape into a fairy tale with some simple lights.
First Things First: What Kind of Lights Should You Use?
There is a wide variety of Christmas lights to choose from and it can be tempting to go with the first ones you find. However, you have to keep in mind that these lights will be strung up on surfaces that are likely larger than you and need to be optimized for the cold season. Mini Christmas lights that have a bulb spacing of six inches are a popular choice for wrapping large trunks and stronger branches.
Mini Christmas lights aren’t the only option. You can also choose between C7 and C9 lights, which feature larger bulbs that are similar to night light bulbs. If you would like a more laid-back, authentic look, C7 and C9 lights are something you should definitely look into.
You should also consider the colour and effect of the lights you would like to have. Warm white lights that either have a slow twinkling effect or remain steady are great if you would like a more classic, sophisticated look. You could also go for bright, multi-coloured twinkling lights if you would like to achieve a more festive look.
Okay, But How Many Lights Do I Need?
Now that you’ve chosen the type of lights you would like to use, it’s important to do basic measurements of your tree. This includes the trunk and any potential branches you would like to string lights upon. When taking the measurement, it is important to remember that not all branches can carry the weight of Christmas lights. You should choose the branches that are more sturdy and can hold the additional weight of the lights you’d like to install.
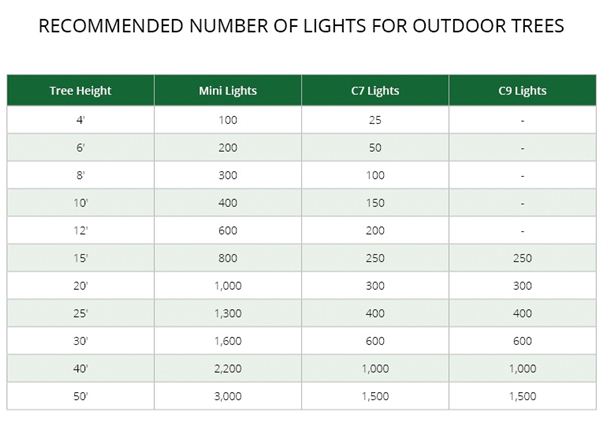
Once you have your measurements ready, you can either do your own calculations or use the Light Calculation Chart provided below to help you more easily determine how many lights you need for your trees.
When choosing the type of Christmas lights, you should also consider the type of tree you’ll be covering. There are multiple types of trees and consequently, some types of Christmas lights will work better on certain types of trees as well.
Due to the thickness of evergreen trees, C7 and C9 bulbs are an ideal solution. You should also consider sticking to a six-inch space between bulbs for maximum coverage and optimal string length.
Deciduous trees, on the other hand, tend to shed their leaves and therefore require fewer bulbs if you opt to drape the lights on. However, if you are considering wrapping the trunk and branches, you should consider Christmas lights that have eight inches of space in between bulbs.
All Right. I Have My Lights, What Now?
Now that your lights are ready, it’s time to decide how much space you would like in between the strings. No, you can’t just loop the string any which way you want. To fully maximize the effect and the number of lights you have, you need to know approximately how much space you would like in between “loops” of string. Most of the time, two to three inches of space in between “loops” is ideal to create enough space while not leaving a “bare” space on your tree.
Once you have everything planned out and decided, it’s time for the fun part: wrapping your tree! You can definitely do this yourself; however, having someone to assist you will make the task easier.
If you have someone around to help you, make sure the string is neatly kept like a ball. Keeping the string in this manner will make it easier to distribute the string without any chance of tangling.
Before you start, you should find your “male” plug and make sure that it is kept at ground level to easily connect it with your power source. Once you have everything figured out, you can start wrapping your lights as tightly as you can around the trunk of the tree, beginning at the base. You can also use zip ties if you would like to secure your lights, but generally, wrapping your lights tightly is enough to ensure they stay in place.
Once you have your desired output, all that’s left to do is plug it in and watch the magic happen! That wasn’t so hard now, was it?
This article is provided by Al Miley & Associates |Expert Tree Care Solutions
203 Toryork Drive, North York, ON, M9L 1Y2
Main Phone: 416-749-3723
Toll Free 1-800-949-3723